新建一个微服务模块
本文旨在:通过archetype命令快速生成新微服务模块
生成新模块
通过mvn 命令生成微服务模块 jeecg-module-erp
重要:包名规则 org.jeecg.modules.* 不要改,不然bean扫描不到!
mvn命令
- springboot3版本使用下面命令
//注意:windows下可直接复制执行, Linux/Macos下  ^ 修改成  \

mvn archetype:generate ^
   -DgroupId=org.jeecgframework.boot3 ^
   -Dmodule=erp^
   -Dmodule-up-first=Erp^
   -DartifactId=jeecg-module-erp ^
   -Dversion=3.9.0^
   -DarchetypeGroupId=org.jeecgframework.archetype ^
   -DarchetypeArtifactId=jeecg-cloud-archetype ^
   -DarchetypeVersion=3.0
重要提醒: DarchetypeVersion版本号
3.0是固定的不要改
- springboot2版本使用下面命令
//注意:windows下可直接复制执行, Linux/Macos下  ^ 修改成  \

mvn archetype:generate ^
   -DgroupId=org.jeecgframework.boot ^
   -Dmodule=erp^
   -Dmodule-up-first=Erp^
   -DartifactId=jeecg-module-erp ^
   -Dversion=3.9.0^
   -DarchetypeGroupId=org.jeecgframework.archetype ^
   -DarchetypeArtifactId=jeecg-cloud-archetype ^
   -DarchetypeVersion=3.0
重要提醒: DarchetypeVersion版本号
3.0是固定的不要改
集成步骤
一、生成项目结构

二、如何启动项目
- 修改启动端口
自定义端口,修改jeecg-module-{模块名}-start/application.yml 的属性 server.port
通过IDEA右键执行类: jeecg-module-{模块名}-start/org.jeecg.Jeecg{模块名}CloudApplication启动项目
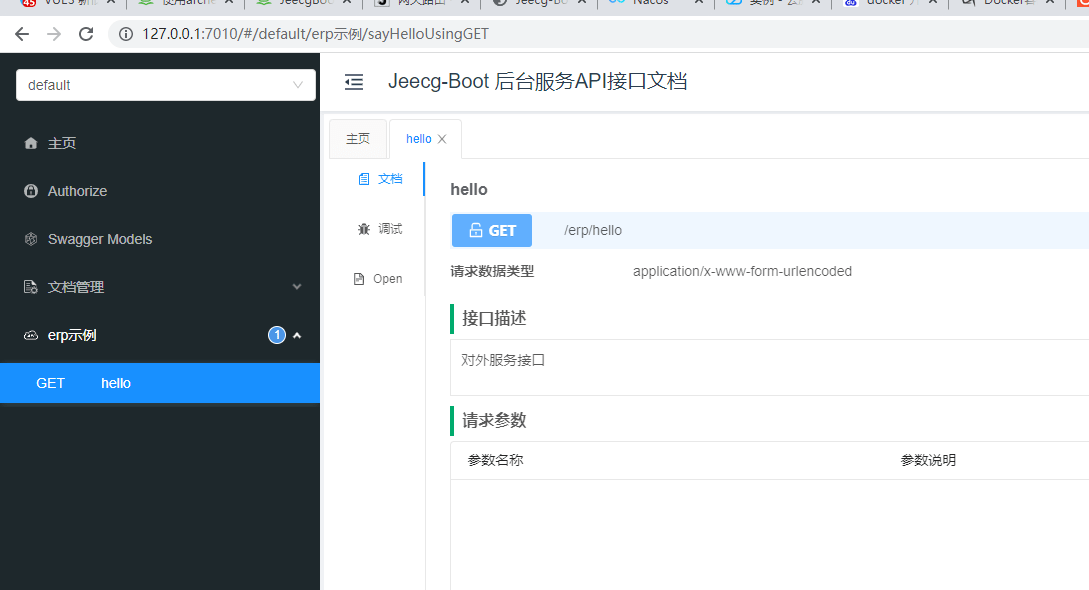
访问服务模块接口地址:http://127.0.0.1:{端口}
- 通过命令启动模块
提醒:前提需要把
jeecg-boot-parentinstall到本地仓库中。
cd  jeecg-module-{模块名}
mvn clean install
cd jeecg-module-{模块名}-start\target
java -Dfile.encoding=utf-8 -Djava.security.egd=file:/dev/./urandom -jar jeecg-module-{模块名}-start.jar
启动成功

在nacos发现此服务

- 添加路由网关
进入系统监控 - 路由网关 菜单
 点击新增微服务模块

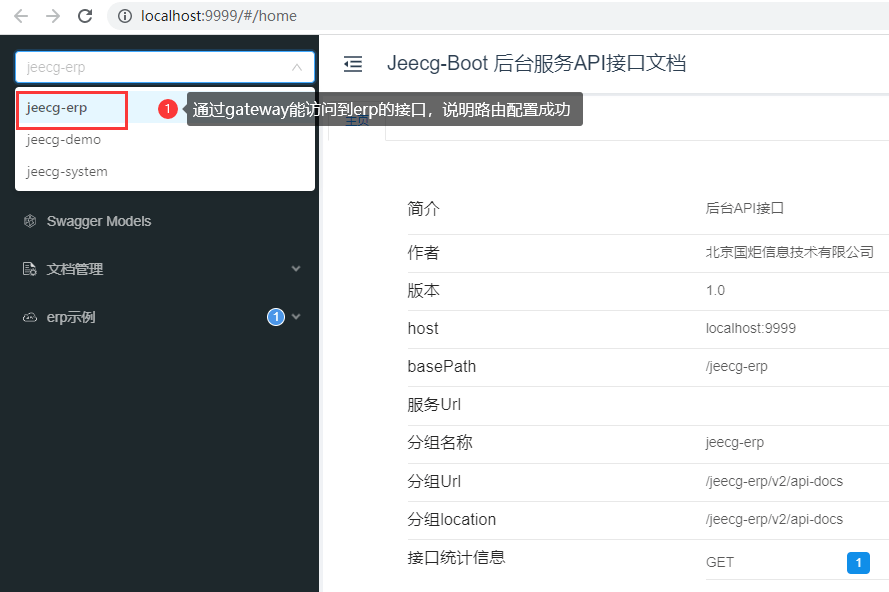
- 访问gateway地址
通过gateway看到生成的新模块,就说明配置网关生效了,下面就可以玩服务之间接口互调了。
- 如果需要调用system模块的api,请引入
注意:springboot3与 springboot2的groupId不同,是org.jeecgframework.boot3
<!--system cloud api-->
<dependency>
    <groupId>org.jeecgframework.boot</groupId>
    <artifactId>jeecg-system-cloud-api</artifactId>
</dependency>